

5 Signs You’re a How to stream on YouTube Live streaming from live events Expert

How to stream on YouTube: Live streaming is steadily increasing in popularity, but surprisingly, YouTube is often overlooked as a great destination for broadcasting your events and epic gamer moments. While most people move to either twitch or mixer, YouTube is a great option, and probably the most likely platform for development if you can crack it.
Even though YouTube still works to make live streaming more prominent for its viewers, if you already have an established channel, it’s a no-brainer to take Google’s platform over the rest.
But how do you start? With the way we stream on our YouTube guide, we’ll have you up and running in no time. Ready to go live?
1. Create or Sign in to your Google Account

If you do not already have one, you will need to create a Google Account. Once you log in, you can use all of YouTube’s features, including liking videos, subscribing to channels, and of course, live streaming.
When you have created your account, log in and click on the small camera icon, which is located in the upper-right hand corner near your profile. From the drop down menu, click “Live Live” and you’ll be taken to the YouTube Studio page.
You may be asked to verify your account, which can be done by providing your mobile number and entering the YouTube verification code you received. You may have to wait 24 hours to activate your account for live streaming, but once it is activated, you can go live immediately.
2. Set Up Your Stream
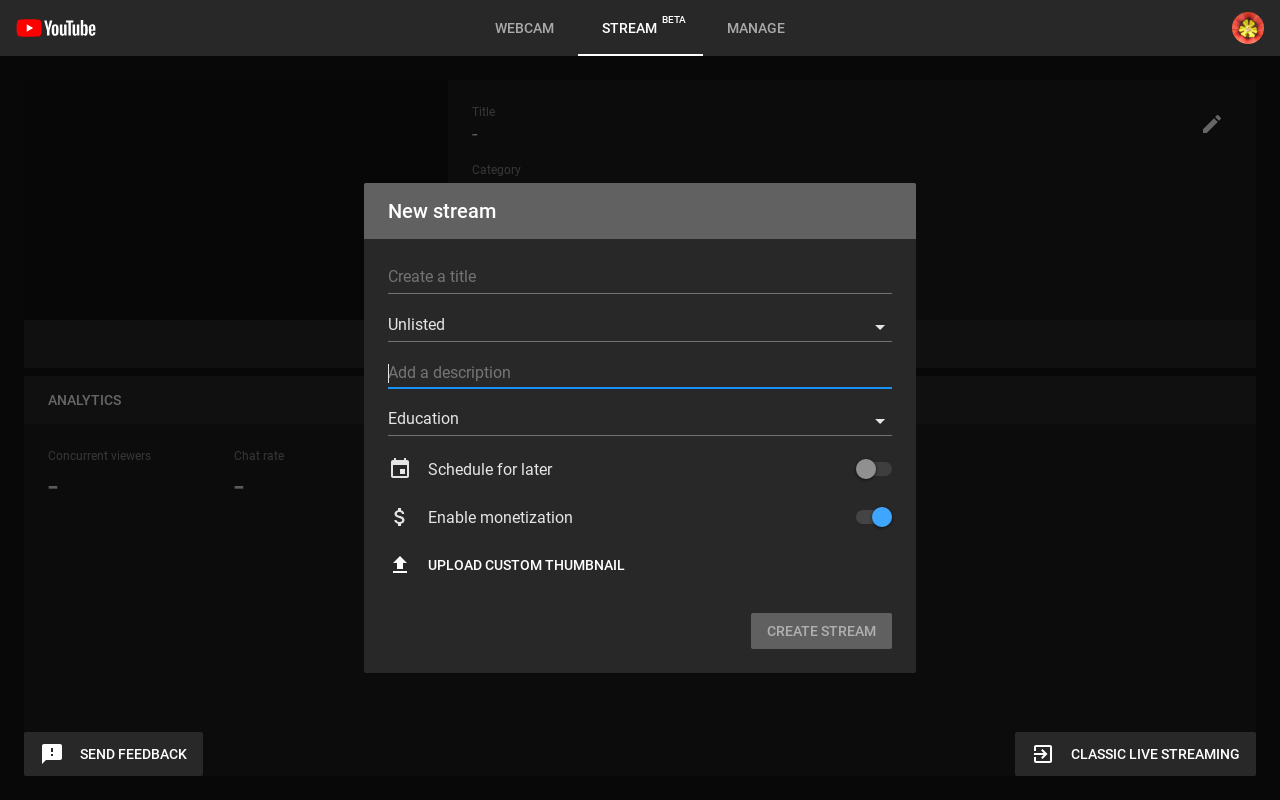
When you are ready to go live, you will be presented with a popup, which requires you to fill in some information. You will be asked to enter a title for your stream and determine if you want to keep it private, make it unlisted or available to the public. You can also add further information as a link in the description box.
Read More: YouTube Now Supports UPI Payments Method In India
You will need to choose what kind of content you are streaming from a variety of available options, including things like gaming, sports, travel and programs, and education. You can then choose to schedule your live stream for a later date, upload a custom thumbnail, and select the audience you want for your video. Once you have done this, click on ‘Create Stream’.
3. Optimize Your Stream Settings

Now, things are a bit complicated here. Once you’ve created your stream, you should see a preview, title, and category of your stream, as well as how many concurrent viewers and likes.
On the right is your live chat, which lets you interact with your audience, and below is your stream setting information. Before we think about hitting the button ‘Button Go Live’, we will need to go into this section quickly.
First of all, you probably won’t need to touch any additional settings. If you do, they are very self-explanatory, such as enabling a DVR (which saves your stream as a video and is automatically checked anyway). However, the area we are most interested in is everything that is left of the additional settings: the stream key and the stream latency.
YouTube will automatically generate a stream key, which you will have to copy and paste into the streaming software of your choice, such as OBS or StreamLabs OBS. If you have a specific property that you want to stream, however, such as 1080p at 60fps, click the dropdown next to ‘Auto-generated key’ and select ‘Create new stream key’.
From here, you can choose the maximum constant bitrate that your connection can support – YouTube makes it clear what kind of speed you’ll need to achieve the desired quality and frame rate.
Once you do this, you will need to choose the latency of your stream. Normal latency, which is the default option, provides the best image quality, while low-latency and ultra-low-latency are best if you want to interact with your audience in near-time.
Read More: YouTube Gets Redesigned Video Watch Page on Mobile
4. Connect your streaming software

Now this method is over, open the streaming software of your choice. For this guide, we will use OBS, which is free to download. For YouTube Settings> Stream> Services’ and select ‘YouTube / YouTube Gaming’. Then, in the box below, paste in your YouTube stream key and hit Apply.
If you have never used OBS before, use the Auto-Configuration Wizard tool and select ‘Optimize for Streaming’. OBS will then test your connection and determine the best settings based on your hardware and upload speed. Once you get your recommended settings, you want to capture the game you want to stream.
Go to the ‘Source’ panel at the bottom of the OBS and click on the ‘+’ icon. From there, choose ‘Capture Game’ from the popup menu. Enter a name for your source, then click ‘OK’. You can then select ‘Capture specific windows’ and select the game you are playing.
5. Configure your audio – live streaming

Last but not least, you will not want to make sure that your audio is working properly. Go back to the source panel we’ve just covered and make sure your desktop audio is enabled – it will take your audio into the game. Speaking of which, again go to ‘Source’, click on the ‘+’ icon and choose ऑडियो Audio Input Device ‘, where you should see the list of available microphones. Choose the one you want to use and in the same way, now you can record your voice.
Read More: Google Play Store Removes 813 Apps Its Qualified A Creepware, Research Claims
When you’re happy with everything, click ‘Start live Streaming’ in the lower right corner. Note: Unlike other streaming platforms, you did not go live immediately. You need to go back to YouTube Studio and click ‘Go Live’ which is located in the top-right corner. The advantage of this is that YouTube will show a preview of how your stream is viewed before the broadcast begins, and will also provide you with details on the health of your stream.
5. Alternatively, you can simply use your webcam

If you just want to live without the use of any streaming software and can just use your webcam, you can. If you haven’t already, you’ll need to grant Google Chrome access to your webcam. Once you have done this, create a stream title and choose if it is appropriate for children. You will then get three seconds to smile for the camera, which will take a quick picture that will act as a thumbnail of your stream. Once you do that, you can go live on YouTube.