

How to take a screenshot on Mac or on Windows 10 in Google Classroom
Sometimes due to various purposes, we have to take a screenshot on Mac or Windows 10 in Google – Google classroom. Here I have given a quick note on how to do that.
How to take a screenshot on Mac and Paste
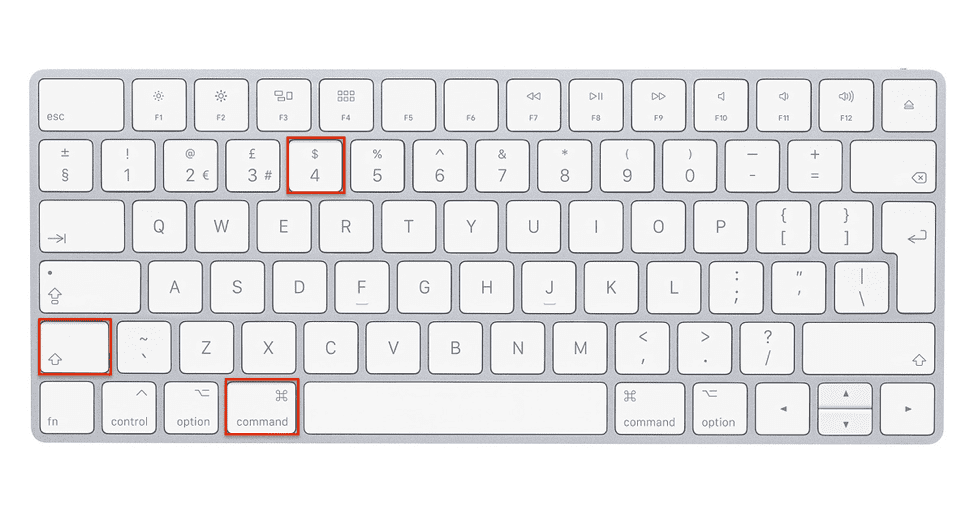
This is not a complicated process.
- As the first step push Shift, Command, and three together
- Hold those pushed keys
- You will see a thumbnail in the corner of your display
- By tapping it you will be able to edit it as your wish
- If no need for necessary editing then skip that step
- Wait until the taken screenshot to save.
How to take a screenshot on a MacBook Air laptop?
As we know, this is a famous item of Apple. Since it has some exciting characteristics, buying one wouldn’t be a disadvantage for you.
Also Read: How to delete hidden history in Reddit 2021-2022 Tricks
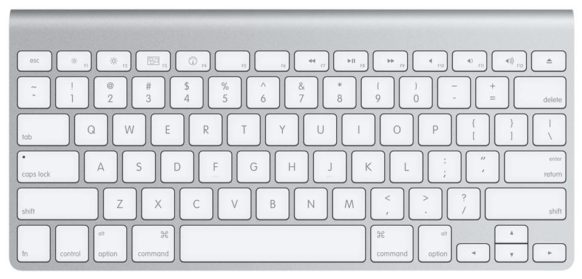
How to take a screenshot in Macbook Airbook?

Here also is a bit similar to taking a screenshot from Mac.
1) Hold shift, command, and three together and you will be able to cover the entire screen.
2) Check the thumbnail of your screen.
3) With it, you can hear a ‘photo clicking’ sound.
4)By tapping it you will be able to edit it as your wish
5) If no need for necessary editing then skip that step
6) Wait until the taken screenshot to save.
Where have your screenshots in Macbook Air been saved
The screenshots which you took will be saved to the desktop. The name of the screenshot will be as
‘Screen Shot [date] at [time].png.’
Sometimes you can change the saving location in macOS Mojave or later. You can drag
the thumbnail to a place that you are hoping to move it in and drop it.
If you need to copy the screenshot, press and hold the Control key when you are getting the
screenshot. Some apps such as Apple TV will not allow you to get screenshots of their windows.
How to take a screenshot on a Mac with a Windows keyboard
If you use a Windows keyboard with your Mac, you can still use the keyboard shortcuts listed above. Since there is no Command (⌘) key in Windows keyboards, you should press the Windows key.
How to take a screenshot on a Windows 10 laptop

The most exciting thing is, there are many options to take screenshots in Windows 10. You can choose any or most suitable and easy method for you.
How to take a screenshot on Windows 10 without snipping the tool
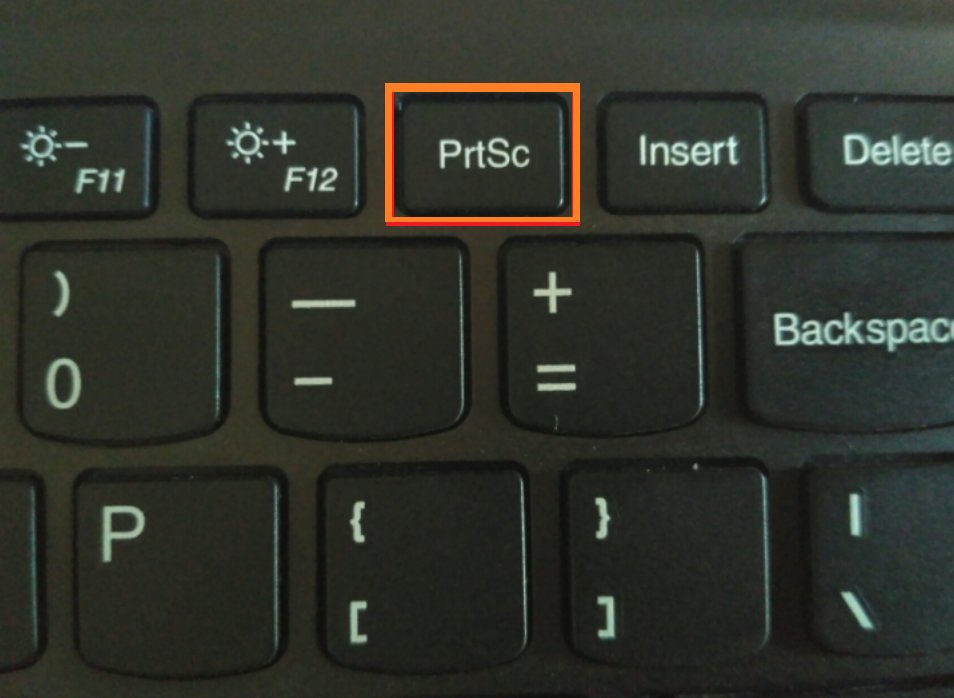
Print Screen
Here you have to click the Print Screen key, also labeled as PrtScn, to capture your
complete screen. In this method, the screenshot will be just copied to the clipboard.
It will not be saved as a file. Because of that, you should open and paste it into image-editing
software such as Microsoft Paint and after that save the file.
How to take a screenshot on windows 10 with the snipping tool

This tool is a default application of Microsoft Windows. It paves the way for you to sketch out
some portion or complete image of your HP computer display.
Do the below steps to get and save the screenshots you want through the snipping tool.
1) Reach to the snipping tool
2) Click the start button
3) Type snipping tool
4) Click on the app of Snipping Tool
5)The following screen will be shown
6) Clicking NEW you can get the screenshot.
7) Choose the particular area that you should grab the screen.
8) The selected area will be shown in the snipping tool
9) Saving screenshot.
Just put Ctrl + S to save the image.
Another way to do it is,
1) Hit on the “File” menu
2) Tap on “Save As.”
3) Simply, choose the place to save the screenshot that you just took.
How to take a screenshot on windows 10 and save it as a jpg

1) First of all, select a place to save the screenshot
2) Click on the “Save” button
3) Tap on File.
4) Choose Save As…
5) Select a Filename.
6) Choose the drop-down beside Save as type.
7) Click the JPEG file.
8) Tap Save.
Read More: How to delete Facebook Account 2021 -A to Z Guide
How to take a screenshot on Windows surface

It’s a high-speed and easy method. To take a screenshot,
1) First of all, hold down your Power and Volume Up key at the same time.
2) When you take the screenshot, there is a flash occurring on the screen.
3) The screenshot should be saved in the screenshot folder at the Pictures on your device.
How to take a screenshot on Windows 11

Here I have explained to you the method of print screen.
1) First press the Windows key and Print Screen at the same time.
2) This will grab every window you have open, even those on secondary displays.
3) Saved image will appear on your PC under the Pictures after the Screenshots.
How to take a screenshot on Windows hp
First of all, click the Windows key and Print Screen at the same time.
The purpose is to capture the whole screen. Your screen will lower the light for a second to show
that the snapshot has been taken.
As the next step open a picture editing program.
Take a new image
After that, you can push CTRL + V to paste.
How to take a screenshot on Windows and crop it
Alt + M can see only in the latest update to Windows 10. When making a rectangular snip, hold
down Shift and use the arrow keys to select the area you need to snip. To take a new
screenshot using the same method you used last, press Alt + N keys. To save your snip, click
Ctrl + S keys.
Now you have a clear idea about ‘how to take a screenshot on Mac and Paste.’ and ‘how to take a screenshot on a windows laptop. It’s a straightforward method if you follow all the steps correctly. If you have any questions to ask, please drop them in the comment section.